Finally, after the passage of much too much time, ULTRAsomething Magazine EXORCISM 09 is now available for sale on the ULTRAsomething STORE.
It was certainly not my intention to allow 10 months to pass between issues, but the gap was not born from the vapid void of laziness. Rather, it was caused by my choice to:
Design and release the extensive, career-summarizing So Far So So photography/blog anthology book last December (available through the ULTRAsomething STORE).
Assemble and master a 2-volume, 25-year retrospective album of ULTRAsomething music (now available on all major music streaming platforms as linked in the “Reminder” section at the bottom of this post).
Re-code the entire ULTRAsomething website from the ground up and create individual, annual PDF archives for easy, offline reading.
Re-build the magazine template in Adobe InDesign, to replace my old Affinity Publisher template (thus allowing me total nuanced control over the rich black images contained within).
Now that my past legacy has been tidied up, I’m back to expanding it further with new content. And thus comes EXORCISM 09. Of course, I’m fully aware that my legacy is entirely inconsequential for both humanity and our eventual Ai overlords, but I’m not doing it for them. I’m doing it for the enjoyment of the future race of aliens who will one day come and re-colonize the planet, and who are most certainly responsible for tinkering with my DNA.
In a feable effort to sell this new issue, I’ve sprinkled a few sample photos throughout this article. I say this every time, but I think it’s my favourite one yet — which is a good thing, ’cause it means I haven’t peaked yet.
Below is the Apologia for EXORCISM 09.
Some people claim to have a spirit animal —a bear, an eagle, a lion. Name a critter, and there’s likely someone somewhere who feels a kinship with it. To the best of my knowledge, I have no spirit animal. Instead, I have a spirit home — Tokyo. And like a man who empathizes with a wolverine but can never be one, such is my relationship with Tokyo. An ocean separates it from my actual Vancouver home. Literally. The entire Pacific Ocean.
I’ve been fortunate enough to make the journey numerous times through the years, and I strive to spend at least two weeks there every year. So essential is this, that the first expense I budget beneath ‘food’ and ‘shelter’ is ‘Tokyo’. I shall never buy another car. My devices creak and wheeze through a 7- or 8-year update cycle, rather than the more typical 2 or 3. I possess exactly one look, which blithely ignores fashion cycles and wardrobe conformance. But Tokyo sojourns? They’re non-negotiable.
Still, I consider myself extremely fortunate to call Vancouver Canada home. Legally bound as I am by the borders of North America and without benefit of a time machine, I can’t think of a single place on this continent I’d rather live at this particular time. And so, I am a man of two cities — a fact plainly evident in the pages of Exorcism 09.
Barring catastrophe, disaster, or catastrophic disaster, I will be releasing EXORCISM 10 in the fall, and an album of entirely new ULTRAsomething music in December… gotta keep those culturally savvy new aliens happy.
REMINDER : As you’ve likely realized, ULTRAsomething is neither an aggregator site nor is it AI-generated. Serious time and effort go into developing the original content contained within these virtual walls — even the silly stuff.
If you’ve managed to extract a modicum of enjoyment from the plethora of material contained on this site, please consider making a DONATION to its continuing evolution. Actual product, including ULTRAsomething Magazine and the So Far So So anthology book are available for purchase in the ULTRAsomething STORE.
And for those looking to engage with the site’s musical content, please check out the 3-hour, 47-song, 2-volume ULTRAsomething compilation album, which is available on all the major music streaming platforms, including Spotify and Apple Music:
With the introduction of the Kodak DCS100 in 1991, I first realized digital photography might one day become “a thing.” Sure, it was a $20,000 chunk of ponderous 1.3 megapixel lab gear that you lugged around on your shoulder and tethered to a Nikon F3. And no, I was no more likely to ever own this than the Lotus Esprit I’d wanted since High School. But it pointed toward the future — a future without the wicked 3-day migraines I would endure after every printing session spent holed up in a sweaty, unventilated, makeshift darkroom with open trays of chemicals. In 1991, I made a wish: that I would one day own a digital camera capable of replacing my 35mm film camera.
Sadly, the migraines meant I couldn’t just sit idly by, year-after-year, waiting for the technology to mature. The most obvious solution was to simply let a lab print my film — but I detested the way lab prints looked and the lack of control I had over the final image. That’s why I invested in darkroom gear in the first place. So I began with the idea of “photographing” on video tape and digitizing frame grabs, which I’d process using Silicon Beach’s “Digital Darkroom” and Adobe’s new toy, “Photoshop.” Digital Darkroom was my preferred platform since it was purely a greyscale program, and I had little interest in colour. The tiny, digitized, freeze frame video results were, not surprisingly, awful.
Fortunately, in 1993, Nikon released their very first Coolscan film scanner. While exorbitantly expensive, it was an order of magnitude cheaper than the nascent digital cameras teasing the high-end journalism market. So I bit the bullet and bought one. Using it was a nightmare. Satan himself couldn’t have designed a more frustrating product. Crippled by its reliance on that God-awful computer connection known as SCSI and its persnickety tendency to disconnect mid-scan, it would often take 4 hours or more for me to get a single image from a single negative. It was harrowing. Clearly, this prevented me from scanning more than a few frames per 36-exposure roll, so I would painstakingly analyze and scrutinize each B&W negative with a loupe to try and decide which were worth the agony of SCSI Hell. I had divested myself of my enlarger, so making contact sheets (which would have been infinitely easier to assess) was no longer possible. Unfortunately, I proved quite incompetent at judging which negatives were worth scanning, so I switched to shooting colour slide film. The slides could be assessed easily for scan-worthiness, though I abhorred working in colour; bemoaned the film’s limited exposure latitude; and grumbled profusely at having to actually have a lab develop the film. But the scans, once arduously achieved, looked great! So I made do for another couple years, grudgingly shooting colour slide film and scanning it, until the first affordable digital cameras finally hit the market.
The first to grace my door was the Apple Quicktake in 1995, whose 0.4 megapixel sensor contained 0.2 megapixels of image data plus 0.2 megapixels of random spurious brightly coloured dots. More toy than tool, I spent another couple years scanning negatives until the Kodak DC120 arrived, with its glorious 1.2 megapixel sensor. Sure, its images still had 0.2 megapixels of random hideousness, but that was now offset by a million pixels of splotchy, oddly-hued, actual image data. It was the first digital camera I used with the intent of printing images, though I usually stuck close to the ‘surreal’ and leaned heavily into the image artifacts, since there was no getting around their existence.
From there I moved through several more digital cameras, including the Kodak DC260 in 1998 (an image from which appears at the top of this post) and, most significantly, the 4 megapixel Olympus E-10 in the fall of 2000. By this point, scanning film was still a laborious chore, but with enough time and patience, I could digitize an entire roll and had thus returned to shooting B&W film. I could have soldiered on with this hybrid technique, but I decided nine years was a long enough wait. And so, in spite of its many flaws, I sold all my film cameras and started shooting digital exclusively — thus ushering in the era in which I produced the fewest photos ever.
There would be several more cameras over the next couple of years — each leaps and bounds closer to achieving my wish for a camera to pull me from my film-less doldrums… until, in 2004, I purchased a Canon EOS 20D. It was the first digital camera with which I could see the forest through the trees — and it was here that I first realized I was in an entirely different forest. The fidelity was now such that I could plainly discern what digital was truly capable of, and that digital would never look like film. Instead, it would always look like digital — and it was a look I didn’t much care for.
For thirteen years, I’d been on a linear march toward digital — one step after another, always assuming the path would end in the replacement for film. And for most people around the world, this is precisely the time at which this happened. But it had the opposite effect on me. It hastened my return to shooting film and a realization that the only way I would ever get a satisfying film look was to actually go back to shooting it. Digitizing film had now become as painless as my dentist claims to be, and with my aesthetic and creative needs once again satisfied, I began to follow the digital evolution from a position of curiosity, rather than need. So, in the mid 200x’s, my digital and film lives finally settled into a peaceful coexistence. Neither was a replacement for the other. They were simply different, like an oil painting is different than a watercolour.
The next decade was a wild one for digital photography — each new iteration of cameras brought massive “improvements” to the previous iteration, and an even greater gap between my own photographic aesthetic and the world’s at large. I stopped chasing ‘the next model,’ and my digital efforts settled into a 3-camera workflow, which continues to this day: The Leica M; the Ricoh GR; and Micro Four-Thirds.
The Leica M decision happened because my photography had long ago shifted into a direction in which rangefinder cameras, far more than SLRs, satisfied my particular needs. For many years, the industry believed the format’s short flange distance made it impossible to ever make a digital version — until Epson did exactly this in 2004. Spurred into action, Leica released the digital M8 in 2006, and digital M’s have been part of my setup ever since. Though a bit financially burdensome, the fact I frequently shoot old Leica M film bodies means the lenses are shared across both disciplines, reducing cost and complexity.
The Ricoh GR joined my happy family because, while rangefinders were my camera of choice for “serious” work, I never left the house without tossing a high-end compact in my pocket. Because of this, I’ve taken as many (if not more) good photos with a compact camera (either film or digital) as I have with my rangefinders. I’ve been shooting Ricoh GR cameras for eons. This includes not only all the modern GR digital cameras but earlier ones (including the marvelous Ricoh GXR series from 2009, which is the only camera system I still regret selling). And right now, over in analog land, my Ricoh GR1v is, by far, my most used film camera.
Micro Four-Thirds entered my life in the fall of 2008, with the release of the system’s very first camera: The Lumix DMC-G1. Since then, there’s never not been a micro four-thirds camera or two (or three) in my collection. Everything I initially loved about Micro Four-Thirds back then, I love even more today. That’s because the system has basically stalled technologically — which I consider to be a tremendous benefit aesthetically, since each new generation of digital cameras rendered images that looked less like what I desire and more like computer animation. It’s obviously a look everyone loves (and continues to love now that Ai imaging is more popular than photography ever was), but it’s not something I ever wish to own. So for me, Micro Four-Thirds remains one of the only digital system formats that has character (or, at least, a character I like). Though it would be erroneous to call its look ‘organic’ (it’s digital after all), it produces artifacts that I find pleasing to the eye. It’s a bit like early digital synthesizers, which sound good precisely because of the digital artifacts caused by such things as aliasing and low bit rates. The brain actually LIKES noise, so as long as the noise remains random (as it does with Micro Four-Thirds cameras), the eye is happy.
Having thus settled into a film/digital cooperative lifestyle, I decided I had a new problem to tackle: Colour. My film cameras were now happily running a thousand feet of B&W film through them every year, but my digital cameras were still stuck shooting in colour — forcing me to continue dealing with its elimination and with the image degradation caused by all the crap needed to produce it. Sensors, of course, “see” only luminance values. Colour must be derived and approximated through a series of red, green, and blue filters placed over the sensor, which creates a mosaic’d image from which sophisticated software algorithms ‘calculate’ their effect on luminance and use this to interpolate a probable colour. So why, I surmised, not just make a camera with only a luminosity sensor? In other words, why not just make a black & white camera? It seemed painfully obvious that one could achieve a much more accurate image if one just got rid of the artificial colour hocus-pocus, ripped out the filters, and used only actual luminance (greyscale) values to form the image.
So, at some point around 2008 I started spamming every camera company on the planet with unsolicited requests for a monochrome camera. To anyone in any photography circle who would listen, I would say “why doesn’t anyone make a black & white digital camera?” It was a question roundly dismissed as ridiculous by anyone to whom I offered it. So imagine my surprise and delight when Leica released the first viable black & white digital camera (The Leica M Monochrom) in 2012. The day this camera arrived at my door was the day I finally knew the ultimate path for digital was not to replace my film camera, but to create an entirely new and different way for me to take entirely new and different B&W photos. I thought all the other companies would follow suit, and for the first time since 1993, I’d be able to consider a digital workflow without any need for a colour component. This seemed like a particularly obvious choice for the Ricoh GR series, since the niche into which it slots practically demands the photos be B&W. Unfortunately, for the next 11 years only Leica dared release a B&W digital camera. It wasn’t until 2023 that Pentax snuck a monochrome sensor into the K-3, becoming the only other company to do so. This gave me great hope, since Pentax is owned by Ricoh. Could a GR Monochrom finally appear?
Sitting next to me, as I type this, is the brand new Ricoh GR IV Monochrome — a camera I’ve waited 14 years for. I’m not a big fan of writing camera reviews, but perhaps I’ll file a few reports once I’ve put some miles on it. Needless to say, you can expect a smattering of Ricoh GR IV images to start hitting this site over the next several months.
So where am I, some 35 years removed from my initial wish for a digital camera capable of replacing 35mm film? Clearly, this did not happen, though the impetus for this wish — to make photographic prints without inducing migraines — was achieved decades ago. Still, much like I continue to feel cheated that the jetpacks predicted in my youth did not come to fruition, I feel let down that I never really got my digital camera wish.
Obviously, and for many hundreds of very good reasons, digital photography absolutely evolved into an industry-wide replacement for film. But it ultimately failed to achieve the one thing that mattered most to me: the “look.” Those things I most like about (B&W) film are still absent from digital images. Digital sensors have a linear response to light, insanely high resolution, and are now essentially noise free. B&W film has a very non-linear response to light and a strong grain structure that robs it of resolution but imparts an organic quality that I find immensely appealing. These attributes cannot be ‘simulated’ with software because they need to occur at the ‘capture’ stage and not at the ‘processing’ stage. If a digital camera has any hope of ‘replacing’ film in my life, it’s going to need a sensor with organically shaped, randomly scattered, grain-like pixels that have a non-linear response to light. So can someone get to work on this, please? After 35+ years of failed promise, is that really too much to wish for?
REMINDER 1 : Don’t forget to order your copy of So Far So So from the Beau Photo website. Keep in mind that Beau prices products in Canadian Dollars and not U.S. Dollars. I recognize many readers don’t realize how weak and valueless the Canadian dollar is, so remember — that CAD$65 price tag you see is only (roughly) US$47, which, frankly, is a figurative steal.
REMINDER 2 : If you’ve managed to extract a modicum of enjoyment from the plethora of material contained on this site, please consider making a DONATION to its continuing evolution. As you’ve likely realized, ULTRAsomething is neither an aggregator site nor is it AI-generated. Serious time and effort go into developing the original content contained within these virtual walls — even the silly stuff. Those who enjoy a tactile engagement with photographs are encouraged to visit the ULTRAsomething STORE, where actual objects, including ULTRAsomething Magazine and the So Far So So anthology book are available for purchase.
COMMENTS : Comments will be moderated before they’re posted to the website, and commenting will be disabled on any article more than 6 months old.
I’m currently assembling ULTRAsomething Magazine Exorcism 09 and, quite frustratingly, continue to bump up against a familiar problem — the gutter in the centre of the magazine.
I wrote about this annoyance last year, in an article titled, The Gutter. And now, once again, I’m rejecting one landscape-oriented photo after another, simply because the magazine’s spine swallows some crucial visual information.
I suppose I could extend my entropic capitulation reliance to cover “magazine layout,” but even as a child it bothered me whenever vital photographic information would disappear into a book’s spinal crevice — and those weren’t even MY photos. Which is why, when I designed the layout for So Far So So, I placed most landscape photos on a single page, rather than across a dual-page spread. Any photos that did cross the gutter were either shifted left-or-right to avoid placing crucial information in the spine, or they had no valuable centre content to begin with. But ULTRAsomething magazine, unlike So Far So So, is a full-bleed publication. So there’s no dancing around the gutter.
I remain ever mindful of this while taking photos, but in the heat of the action, it’s not always possible to ensure the photo’s centre remains a barren wasteland. Fortunately, my natural tendency to frame vertically means around two-thirds of my shots never need cross a gutter. But the other third? The ones I take without throwing my arms all akimbo in an awkward effort to rotate the camera? Those remain locked in an eternal struggle with the gutter.
Consider, if you will, the tiny selection of photos contained within this article. When I returned from my annual Tokyo trip a couple months ago, I performed my usual brutal photographic cull — reducing the collection to a tidy little group of selects, which I deemed worthy of future publication. But this week, after sifting through that collection for possible inclusion in ULTRAsomething Exorcism 09, I was forced to reject 30 of them simply because they wouldn’t survive the trip across the gutter. And that’s just two weeks’ worth of Tokyo selects. Imagine how many other selects get rejected for this same reason!
Fortunately, I have a vast collection of photos with which to assemble Exorcism 09, and there’s no guarantee any of these would have made the final cut — gutter or no gutter. But it’s just such a nuisance. And what’s the point of having a blog if you can’t whine petulantly about your nuisances to the rest of the world?
OK. Back to work on issue 9, which I’ll hopefully send to the printer in the next few weeks.
As mentioned, this collection of photos is but a tiny snippet of Tokyo-only landscape-oriented shots, which I was forced to reject simply due to gutter concerns.
An additional note on the final three “Surveillance” shots: These are part of a series I began shooting, which I hoped would illustrate the disconnect between people’s desire for privacy and the reality of the blanket of surveillance surrounding us all. Ultimately I decided to abandon this because, along with that cursed gutter problem, the concept just seemed too banal and obvious. Also, I forgot I’m not the sort of photographer who actually explores themes. Instead, themes seem to explore me.
REMINDER 1 : Don’t forget to order your copy of So Far So So from the Beau Photo website. Keep in mind that Beau prices products in Canadian Dollars and not U.S. Dollars. I recognize many readers don’t realize how weak and valueless the Canadian dollar is, so remember — that CAD$65 price tag you see is only (roughly) US$47, which, frankly, is a figurative steal.
REMINDER 2 : If you’ve managed to extract a modicum of enjoyment from the plethora of material contained on this site, please consider making a DONATION to its continuing evolution. As you’ve likely realized, ULTRAsomething is neither an aggregator site nor is it AI-generated. Serious time and effort go into developing the original content contained within these virtual walls — even the silly stuff. Those who enjoy a tactile engagement with photographs are encouraged to visit the ULTRAsomething STORE, where actual objects, including ULTRAsomething Magazine and the So Far So So anthology book are available for purchase.
COMMENTS : Comments will be moderated before they’re posted to the website, and commenting will be disabled on any article more than 6 months old.
After spending the past several months beavering away on both the ULTRAsomething retrospective book (So Far So So) and re-coding this website from the ground up, I planned to spend February working on UTRAsomething Magazine Exorcism 09.
So much for plans.
In late January, I wrote and recorded two new songs, which I posted to the ULTRAsomething site. Thanks to a coding snafu (surprisingly not of my own making), subscriber notification was botched, and not a lot of people read that post. “No big deal,” I thought, “it’s just music.” But the more I thought about it, the more I decided music IS a big deal, and maybe it’s time I put some effort into creating an ULTRAsomething musical retrospective as well.
The timing was ideal. I’d already drawn a line demarcating 2026 as the beginning of the new ULTRAsomething, and 2025 as the final year of the old. Making things even tidier was the fact that a song I wrote in 2000 was the first song uploaded to the original ULTRAsomething site (eight years before it became a photography blog). So I could do a quarter-century musical retrospective (2000-2025) of ULTRAsomething musical material.
Unlike So Far So So, which absolutely needed to be physical media, the musical retrospective could get away with being digital. Problem was, I’d never bothered to put any of this music on any of the major streaming sites, since I never intended it to be anything other than support music for ULTRAsomething.
So the new plan emerged: assemble a quarter-century ULTRAsomething music retrospective album, and make it available to all the major streaming services.
Done.
The end result is nearly three hours of remastered music. Much of it was released in some form or other in the past — either as stand-alone music, or as soundtracks I wrote specifically to accompany numerous ULTRAsomething vBooks. A couple songs were written & published to showcase synthesizer sound libraries I had designed, and the rest are a smattering of unpublished recordings, including a few “live” recordings (no multitracking — just realtime improvisations, often recorded direct to iPhone).
Given this, the title became obvious: Sounds, Tracks & Soundtracks. I once again relied on Nicole Langdon-Davies to design the cover (as she had done for So Far So So) to ensure a sort of cohesion between the two different mediums. The cover art is perfect, since it looks exactly like the music sounds — always the Holy Grail of album art design.
I’d planned to release it as one long 47-song album, which began with music from 2000 and ended with music from 2025, but the universe (as usual) intervened. Apparently, many streaming services have a strict 35-song maximum on any album. Sure, you can circumnavigate this arbitrary number if you’ve got a name that makes people capitulate to your will. I don’t. I am the one who must capitulate. So once again, I embraced ULTRAsomething’s “Entropic Capitulation” tagline and split the album into two volumes. As often happens with entropic capitulation, this didn’t work out too badly. I kept Nicole’s original black on white cover art for volume 1, and simply inverted it to white on black for volume 2. This too, worked well, since volume 2 (which contains the newer recordings) is definitely the darker of the two releases, and I can now simply refer to them as ‘the white album’ and ‘the black album’.
Both the black and the white albums are available on all the major streaming platforms. Here are direct links to Spotify, Apple Music, iTunes, Tidal, and Amazon Music Unlimited:
Other stores and streams (such as Deezer and YouTube) are currently being uploaded/configured, so if your listening platform isn’t yet listed in the hyperlink above, try searching for ULTRAsomething in your music streaming service of choice.
Hopefully, this marks the end of my ‘retrospectives’ and I can now put the pedal to the metal on future projects… though I do have a nagging thought that I probably have enough vBooks and other films to do a blu-ray retrospective of ULTRAsomething videos… but I’m doing my damnedest to resist that temptation. You’re welcome.
Late in Volume 2 : Indeed, this was shot inside my recording studio late in the recording of Volume 2 — specifically around mid-2024. Not that I knew at the time there would be a Volume 2, much less a Volume 1. It was taken for the simple reason that I needed to burn the final frame on the Fuji Natura Black 1.9, so I could develop the roll. But, throwaway shot that it is, there’s still some insight to be gleaned. One, obviously, is that the look of studio pretty much explains the sound of the music. Anything this dark and murky will surely result in the sonic equivalent. Another is the photo’s ‘time capsule’ aspect, and the realization of how quickly gear turns over here. I basically have to run all that is ULTRAsomething out of a room that’s only around 8′ x 8′ (2.5m x 2.5m). This ensures I adhere to a strict one-in-one-out rule. So if there’s a new piece of studio gear I want, an old piece needs to be sacrificed. Believe me, I’d love to still have all the gear I’ve had for the past 50 years — Once gear reaches a certain age, it becomes much more valuable (unlike the way we view humans), and if I still had some of my synthesizers from the 80’s and 90’s, the studio could actually double as a retirement portfolio. Sadly, that’s not the case here. So, in spite of this shot being only two years old, I find myself looking at several pieces of gear that are no longer part of today’s studio.
Album Covers : As mentioned in the article, the cover art was created by Nicole Langdon-Davies, who also did the cover art for the So Far So So book.
REMINDER1 : Don’t forget to order your copy of So Far So So from the Beau Photo website. Keep in mind that Beau prices products in Canadian Dollars and not U.S. Dollars. I recognize many readers don’t realize how weak and valueless the Canadian dollar is, so remember — that CAD$65 price tag you see is only (roughly) US$47, which, frankly, is a figurative steal.
REMINDER2 : If you’ve managed to extract a modicum of enjoyment from the plethora of material contained on this site, please consider making a DONATION to its continuing evolution. As you’ve likely realized, ULTRAsomething is neither an aggregator site nor is it AI-generated. Serious time and effort go into developing the original content contained within these virtual walls — even the silly stuff. Those who enjoy a tactile engagement with photographs are encouraged to visit the ULTRAsomething STORE, where actual objects, including ULTRAsomething Magazine and the So Far So So anthology book are available for purchase.
COMMENTS : Comments will be moderated before they’re posted to the website, and commenting will be disabled on any article more than 6 months old.
This must be how it starts. The tumble into geezerdom. The slippery slope of cognitive decline.
How else to explain that I haven’t a clue what this is a photo of?
I developed and scanned it just tonight. I know exactly when I shot it — it was only a few days ago. I know where I was when I shot it — I recognize the photos I took both before and after it. I know what camera and lens I used — an Olympus OM3Ti with an 85mm f/2. I know I’m the one who shot it, because I was alone the entire time. I know it’s not an accidental exposure because it’s framed with the same careful attention to composition I always employ (even if it doesn’t look like it to the uninitiated).
So what is it? And just as importantly, which way is “up?”
This isn’t the first time something like this has happened — though I can probably count the incidents with the fingers of a single hand. I usually have pretty good recall of every photo I take — even all the murky, blurry, abstract ones. The last time something similar happened was a half-dozen years ago. In that case, I could remember taking the photo, and I knew what the photo was… but I couldn’t remember where I took it. I obsessed over it for months until one day I happened to stroll past the object. “Oh! That’s right!” I thought — pleased to have repaired the missing brain cell.
But this situation is actually the opposite of that one. In the case of this photo, I know roughly WHERE I took it (even though I don’t remember taking it), but I don’t know what it’s a photo OF. I have no doubt it’s going to drive me nuts until I waste an afternoon to go looking for the answer.
REMINDER 1 : Don’t forget to order your copy of So Far So So from the Beau Photo website. Keep in mind that Beau prices products in Canadian Dollars and not U.S. Dollars. I recognize many readers don’t realize how weak and valueless the Canadian dollar is, so remember — that CAD$65 price tag you see is only (roughly) US$47, which, frankly, is a figurative steal.
REMINDER 2 : If you’ve managed to extract a modicum of enjoyment from the plethora of material contained on this site, please consider making a DONATION to its continuing evolution. As you’ve likely realized, ULTRAsomething is neither an aggregator site nor is it AI-generated. Serious time and effort go into developing the original content contained within these virtual walls — even the silly stuff. Those who enjoy a tactile engagement with photographs are encouraged to visit the ULTRAsomething STORE, where actual objects, including ULTRAsomething Magazine and the So Far So So anthology book are available for purchase.
COMMENTS : Comments will be moderated before they’re posted to the website, and commenting will be disabled on any article more than 6 months old.
January in Vancouver never really cooperates with my desire to stroll around aimlessly with a camera in-hand and a spring in my step. On most days, the skies are belching rain — except on those rare occasions otherwise, when the air turns frigid and my fingers ache to hold a camera. So, my January’s are usually spent struggling with taxes, trimming my closets of unnecessary content, and feeling sorry for myself that I’ve seemingly ‘lost it’ as a photographer.
But this year, I tried something different to while away the January doldrums: music composition. Truth of the matter is, I’m pretty much always noodling around on some synthesizer or another — sometimes working out actual song ideas, and sometimes simply exploring new sound design avenues. Rarely, if ever, do I bother to take any of it to completion; much less publish it. But this month, perhaps spurred on by my new “who cares” attitude for the website, the thought hit me: why NOT publish some of these musical sketches? My photos are nothing if not sketches, as are the articles I pen for this blog — articles which I plan to make even sketchier now. So why do I balk at the idea of publishing my musical sketches? It’s not like I’m going to wreck my musical reputation or anything — I have none.
So here are two sound esquisses, both of which I developed in the past couple of weeks. They follow a similar theme (in that each incorporates some segment of sonic degradation), but not necessarily a similar sound.
If the titles seem a little opaque, that’s because they’re not really titles, but dates. Specifically, each song gets a working YY.MM.DD title, which corresponds to the day I began working on it. However, a song’s start date doesn’t necessarily correspond to when it gets finished. For example, in spite of 26.01.22 being the first song I started working on, I actually completed and mastered 26.01.28 before it. Songs gestate at different rates, meaning they may well be published seemingly ‘out of order.’ So don’t be surprised if, at some point, a new song drops with a title indicating a start date of last year.
I suppose, once a song is finished, I could give it a proper title. After all, that’s what I do with my photos. And it’s what I’ve historically done with my music. Doing this made more sense back when I was composing actual songs for actual albums that contained actual lyrics — but that’s not what these are. These are just little cosmic sketches.
I’m trying to think of them like I think about my photos — that each is merely part of a greater whole, and not necessarily a stand-alone product. Each is but a snapshot of a fleeting moment or idea; captured for anyone who cares look or listen.
26.01.28 : This song began life as a 15 second snippet of bespoke horror music, which I wrote as a joke to accompany my girlfriend’s 15 second video of a BBQ duck swinging in a Chinatown storefront. Curiously, I rather liked those 15 seconds, so I decided to expand it into an entire song that no longer had anything to do with BBQ duck. Midway through the composition, and no longer sure where to take it, I asked myself “what would Jaki Liebezeit play if he were still alive?” So I wrote the central Can-like drum groove as my mythical answer. It gets initially obfuscated by some rather cavemanesque drumming I added when the rhythm first kicks in, but it shines through nicely by the end.
The photo selected to represent the song (and be cropped into the necessary square) is called “Lo-Fi” (since it looks like a dirty waveform) and was photographed with an Olympus OM-3Ti and an F.Zuiko 50mm f/1.8 lens, on HP5+ pushed to ISO 800 and developed in Rodinal (Blazinal) 1:50.
26.01.22 : This was supposed to be a jaunty little Buchla Music Easel piece and consist ONLY of sounds generated by the Buchla Music Easel. But after recording the little blippy pattern that begins the song, I accidentally noodled a piano part over top of it, thus hijacking the intended direction entirely.
The photo representing this song is called “Alternatives”, and was shot on a Contax G1 fronted with a Contax Zeiss Biogon 28mm f/2.8 lens, using FP4+ pushed to ISO 400 and developed in Rodinal (Blazinal) 1:25.
REMINDER 1 : Don’t forget to order your copy of So Far So So from the Beau Photo website. Keep in mind that Beau prices products in Canadian Dollars and not U.S. Dollars. I recognize many readers don’t realize how weak and valueless the Canadian dollar is, so remember — that CAD$65 price tag you see is only (roughly) US$47, which, frankly, is a figurative steal.
REMINDER 2 : If you’ve managed to extract a modicum of enjoyment from the plethora of material contained on this site, please consider making a DONATION to its continuing evolution. As you’ve likely realized, ULTRAsomething is neither an aggregator site nor is it AI-generated. Serious time and effort go into developing the original content contained within these virtual walls — even the silly stuff. Those who enjoy a tactile engagement with photographs are encouraged to visit the ULTRAsomething STORE, where actual objects, including ULTRAsomething Magazine and the So Far So So anthology book are available for purchase.
COMMENTS : Comments will be moderated before they’re posted to the website, and commenting will be disabled on any article more than 6 months old.
If you’re reading this article on or around the date it was posted, then you’re experiencing ULTRAsomething’s brand new version 2 website. Visitors from the distant future are more likely gazing upon some yet-to-be-designed variation, meaning this post is now out of date — so just tell your A.I. synopsis-izer to skip it.
In truth, calling it version 2 is inaccurate. The site bounced off its first satellite at the turn of the millennium — coded entirely in Dreamweaver, and with the singular purpose of hosting my online product design portfolio. It endured several redesigns over the years, before succumbing to its first major upheaval in December 2008 — when my coding switched to WordPress, and the site’s purpose shifted into the photography (and sometimes music) blog you see before you.
From 2008 through 2025, the site and its purpose remained mostly unchanged, albeit with numerous redesigns along the way. At the end of 2025, I released my So Far So So anthology book, which seemed like a perfect time to jettison the old site and begin anew.
The most crucial thing was to scrap the rickety 18-year-old WordPress code upon which this site was built. Though ULTRAsomething may have looked good to the naked eye, the code supporting it was made of twigs and gravel, held together with a heaping helping of coding bandaids, glue, and work-arounds. Every time WordPress updated their code, I would have to implement more hacks to keep the site online. So, my first order of business in 2026 was to re-code the site from the ground up using only the absolute latest WordPress techniques.
Since the old site functioned rather well for my needs, save for not incorporating a proper shopping cart (which the new site also doesn’t have), I decided to keep it structurally the same. So, it looks and works almost exactly like the last site — perhaps not quite as elegantly, but elegance requires code maintenance that I just don’t have time for. As part of this process, I also created an 18-year PDF archive of ULTRAsomething posts (one PDF per year), with each PDF containing all the posts, photos and reader comments for that calendar year. My initial plan was to remove ALL previous HTML content from the web, but I’ve decided to leave it online for the time being. Historians can choose whether they want to read the old HTML posts, or the shiny new PDF downloads.
So, if version 2 (which is really version 3) is essentially the same as version 1 (which was really version 2), then what makes it worthy of the version 2 moniker? The answer is ‘philosophy’.
Basically, instead of altering the way you (the reader) views the site, I’m shifting the way that I (the writer) views it. I am abandoning my self-imposed dictate that I publish something at least once a month (a dictate I previously said I was abandoning, but didn’t). I’m also going to post whatever I want whenever I want. If it’s just a single photo with no text, then so be it. If it’s just a single sentence with no photo, then so be it. A song idea; an amusing anecdote; a bit of news; an unrealized plan; a project in progress — basically, anything I choose to share will get shared, no matter how banal. Previously, with very few exceptions, I would only post fully-baked articles in which I explored every angle of some topic’s banality. No more — baking articles just isn’t how I want to spend my remaining years.
So welcome to ULTRAsomething 2.0. Debugging continues, but the bulk of the work is complete. Hopefully this version’s underlying code lasts until it becomes my estate’s responsibility to update it, and not mine.
ABOUT THE PHOTOS :Upon the release of ULTRAsomething Version 2, I was determined to stop publishing basic technical information for most of the photos. But I just can’t seem to help myself. So:
Servile : Shot with a Ricoh GRIII.
Spirit Photography : Photographed with a Leica M10 Monochrom, fronted with a Voigtlander 50mm f/1.5 lens.
Tractor Beam Avoidance Tactics 101 : Shot with an Olympus OM-3Ti and a Zuiko 85mm f/2 lens on FP4+, pulled to ISO 50 and developed in Rodinal (Blazinal).
REMINDER 1 : Don’t forget to order your copy of So Far So So from the Beau Photo website. Keep in mind that Beau prices products in Canadian Dollars and not U.S. Dollars. I recognize many readers don’t realize how weak and valueless the Canadian dollar is, so remember — that CAD$65 price tag you see is only (roughly) US$47, which, frankly, is a figurative steal.
REMINDER 2 : If you’ve managed to extract a modicum of enjoyment from the plethora of material contained on this site, please consider making a DONATION to its continuing evolution. As you’ve likely realized, ULTRAsomething is neither an aggregator site nor is it AI-generated. Serious time and effort go into developing the original content contained within these virtual walls — even the silly stuff. Those who enjoy a tactile engagement with photographs are encouraged to visit the ULTRAsomething STORE, where actual objects, including ULTRAsomething Magazine and the So Far So So anthology book are available for purchase.
COMMENTS : Comments will be moderated before they’re posted to the website, and commenting will be disabled on any article more than 6 months old.
As each year concludes, I sift through the technical data that’s attached to every photo in my Lightroom catalog, and get a snapshot of the year’s proclivities (yes, this site now engages in bad puns). What cameras did I shoot the most? What film? What focal lengths? Anything I need to consciously adjust or try in the new year? Anything I neglected to do?
I’ve never bothered to publish this analysis because it’s unlikely to have any relevance to my readers. But this year, I decided nothing on this site actually has any relevance to anyone (including me), so why not publish it? Essay fodder is hard enough to come by without willfully dismissing it.
There are four categories this year (up from three in past years). They are: Most Used Film Camera; Most Used Digital Camera; Most Used Film; and Most Used Focal Length.
In previous years, 95% of my shots were taken on film, so there was no need for a “Most Used Digital Camera” category. But last summer, I decided to try doubling my photographic output without doubling my film, chemistry, and developing time expenses. This meant re-engaging with digital to an extent not seen in over a decade. Consequently, the old “Most Used Camera” category was split into two: “Most Used Film Camera” and “Most Used Digital Camera”.
So without further ado…
Most Used Film Camera
A mere (for me) 29 film cameras were used in 2025. Many had only 1 or 2 rolls run through them, since I might have simply been testing the camera, or borrowing it, or just exercising an old friend that was languishing on the shelf. But a few got heavier use, and in 2025 (and for the third year in a row), the award for Most Used Film Camera goes to the Fuji Natura Black 1.9, which was singularly responsible for 12% of this year’s film rolls. The Natura Black 1.9 is in my pocket every time I’m out after dark, and is filled (usually) with HP5+ that I’m pushing to 3200. If it’s dark out and I’m on the streets, the Fuji is in my hand.
This year’s runner-up is a camera I purchased in Tokyo in November, when my beloved Minolta TC-1 failed and I was “forced” (and I use the term loosely) to hit Shinjuku, and replace it with a camera I always wanted to own but could never justify: The Ricoh GR1V. Because it instantly became my constant companion in Tokyo, it was responsible for 11% of this year’s photos — in spite of me owning it for just over a month.
In third place was the Leitz-Minolta CL, which accounted for 9% of this year’s film camera usage. At this point, we need to start considering lens mounts and not just camera bodies. The CL is an interchangeable lens camera that uses a Leica-M mount, meaning it shares lenses with many other Leica cameras (including my M2 and my M6TTL, both of which also saw a few rolls of film this year). Taken as a whole, M-mount cameras accounted for 15% of this year’s photos, which is actually more than the Natura Black 1.9.
But if “lens system” was a category (and it’s not), then this year’s winner would again be the Olympus OM-mount, which spooled 16% of the year’s film through six different OM bodies (M-1, OM-1, OM-2n, OM-3Ti, OM-20, and OM-2000). Yes, I have a thing for Olympus OM cameras.
Other system mounts that charted across multiple bodies were the Nikon F-mount (7%) and Pentax K-mount (6%). Half-frame cameras also featured somewhat prominently (accounting for 10% of all film camera usage).
Most Used Digital Camera
This award, had it existed in previous years, would always have gone to the Ricoh GRIII, since it’s the one digital camera that’s always with me “just in case.” But last summer, I decided to expand my digital efforts and devise a way for the photos to match (or at least compliment) my desired aesthetic. Naturally, this required some serious digital experimentation — all of which lead me right back to what I always knew I liked: micro four-thirds cameras. So I supplemented my old digital Olympus OM-1 with an even older digital Olympus Pen-F, and added the new OM Systems OM-3 to the collection, rolled up my sleeves, and got shooting.
Which means the winner of the first-ever “Most Used Digital Camera” award goes to the OM Systems OM-3, which was responsible for 49% of this year’s digital shots (though most, admittedly, were about ‘learning’ and less about ‘art’). Following in second was the Olympus Pen F (17%), with the Ricoh GRIII and Olympus OM-1 tying for third (at 13% each). The remaining 8% of digital shots were spread amongst other various cameras.
Most Used Film
And the Grainy goes to… Ilford HP5+.
For the first 30 years of my photographic life, this award would have gone to Kodak Tri-X, but the stuff got so exorbitantly expensive that I was forced to switch to HP5+ for the past decade. Like Tri-X, HP5+ is versatile and usable under all sorts of circumstances. I regularly shoot it at ISO 200, 400, 800, 1600, and 3200 without hesitation. In fact, ISO 400 (box speed) may be the one I shoot the least. So, for this reason, it accounted for 46% of my film usage in 2025.
Second place goes to Fomapan 400 at 23%, which I almost always pull to ISO 200. It’s quite economical, and does a terrific job taming the harshness of daylight, which is something I often attempt to do.
In those rare instances when I instead endeavour to accentuate the harshness of daylight, I turn mostly to Ilford FP4+ (13%), which I usually push to either 200 or 400 — specifically to get an even harsher, higher contrast negative.
I started experimenting with Wolfen UN54 (10%) this year, and am loving the results when shot at box speed (ISO 100). It too (like Fomapan) has a lower contrast, less-clinical look, and allows me to achieve ‘dreamlike’ results under harsh sun. I’ll be using it more in the coming years.
Rounding out this year’s film usage were Foma’s new Ortho 400, some long-expired Fuji Neopan 1600 and a sprinkling of color (Kodak Ultra 400 and Ilford Phoenix II), which I’m usually forced to use for testing cameras while traveling (since it’s easy for labs to develop). Surprisingly, for the first time ever, I went a full year without shooting a single roll of Tri-X.
Most Used Focal Length
In order to have some sort of ‘common denominator,’ I broke down all the year’s shots (both digital and film) into their 35mm “equivalent field of view” focal lengths (meaning, for example, that half-frame focal lengths or micro four-thirds focal lengths were adjusted to their 35mm ‘full frame’ field-of-view ‘equivalent’).
For this site’s first 15 years, the vast majority of my shots were taken at 28mm or wider, but the last couple years I’ve made a conscious effort to shoot more 35mm and 40mm lenses. And in 2025, I decided to experiment more with longer focal lengths — particularly in the 85-90mm range.
Because I group all these lenses into ranges of focal lengths, it’s hard to say which specific focal length was the most used — but 22% of last year’s photos were taken in the 29-39mm range, making “35-ish” the top performer — an award it probably hasn’t won since the early 2000’s.
Here’s the final list:
• < 28 mm (ultra-wide) : 19% • 28 mm : 19% • 29-39 mm (35-ish): 22% • 40-49 mm (40-ish): 14% • 50 mm : 8% • 51-84 mm (no man’s land): 2% • 85-90 mm : 10% • > 90 mm (telephoto): 6%
A full 60% of my photos were shot at less than 40mm, indicating that my propensity to shoot wide has not abated. I’ve always struggled to shoot a so-called “standard” 50mm lens, and this is clearly indicated in the stats. I have, however, found love and happiness in various 40-ish mm lenses, and this too is reflected in the numbers. At 10%, I think my conscious effort to shoot more 85-90mm lenses was a success, while I clearly have an aversion to lenses in both the 51-84mm and >90mm ranges.
Thank You and Good Night
So that’s it for the 2025 Grainy Awards. No one got slapped; no one strutted on the red carpet in a naked dress; and no celebrities were insulted — though I honestly would have enjoyed penning this article more had any (or all) of these occurred.
ABOUT THE PHOTOS : After combing through a few folders of mish mash for this month’s accompanying photos, I realized I didn’t include any digital photos — which I probably should have done given the fact I gave out a Grainy Award for “Most Used Digital Camera.” Come to think of it, I probably should have included only photos that illustrated the winner of each category — but that would have required I be as clever as I was in this site’s early days. I’m not. So here’s what got randomly included:
The Grainy : Shot with an Olympus OM-2n and a Zuiko 85mm f/2 lens on Fomapan 400 pulled to ISO 200, and developed in Rodinal (Blazinal).
A Stroll Down Memory Lane : Utilized a Pentax MZ-S with an 85mm f2.2 soft lens, loaded with HP5+ at ISO 400, and developed in Rodinal (Blazinal).
Grainier Than Thou : Photographed with a Leica M2 and a 35mm f/2 Summicron-M (v4) lens on Fomapan 400, pulled to ISO 200 and developed in Rodinal (Blazinal).
Grain on Grain 1 : Used a Japanese market Leitz/Minolta CL with a Minolta 40mm f/2 Rocker lens and HP5+ at ISO 400, which was developed in Rodinal (Blazinal)
Grain on Grain 2 : Shot with a Fujica Drive (half frame camera) on Fomapan 400, pulled to ISO 200 and developed in Rodinal (Blazinal).
Registration Error : Photographed with a Contax G1 fronted with a Contax Zeiss Biogon 28mm f/2.8 lens, and loaded with HP5+ pushed to ISO 1600 and developed in Rodinal (Blazinal).
REMINDER 1 : Don’t forget to order your copy of So Far So So from the Beau Photo website. Keep in mind that Beau prices products in Canadian Dollars and not U.S. Dollars. I recognize many readers don’t realize how weak and valueless the Canadian dollar is, so remember — that CAD$65 price tag you see is only (roughly) US$47, which, frankly, is a figurative steal.
REMINDER 2 : If you’ve managed to extract a modicum of enjoyment from the plethora of material contained on this site, please consider making a DONATION to its continuing evolution. As you’ve likely realized, ULTRAsomething is neither an aggregator site nor is it AI-generated. Serious time and effort go into developing the original content contained within these virtual walls — even the silly stuff. Those who enjoy a tactile engagement with photographs are encouraged to visit the ULTRAsomething STORE, where actual objects, including ULTRAsomething Magazine and the So Far So So anthology book are available for purchase.
COMMENTS : Comments will be moderated before they’re posted to the website, and commenting will be disabled on any article more than 6 months old.
If one assumes the idea of a periodical is to publish it periodically, then one might assume it’s about time to exorcise another ULTRAsomething magazine. And while the assumption is indeed sound, a spurious event has altered this reality. Unlike most spurious events, which tend to range somewhere between annoying and disastrous, this is actually a good event — one that’s been 17 years in the making.
This month, to commemorate the 17th year of the ULTRAsomething website, I am releasing SO FAR SO SO — a 396 page retrospective of photos and articles culled from the site’s rather vast archives.
It hasn’t been easy corralling this much content into a single, manageable, cohesive and comprehensive volume. The process has taken the better part of a year, but the results speak for themselves — the curation is ideal, and the print quality is superb. As someone who is well-versed in the art of self-deprecation, I can find nothing to be self deferential about. SO FAR SO SO is, I believe, the finest thing I’ve produced to date.
While fulfilling magazine orders shoehorns into the simple dictates of my sticks and chewing gum website, worldwide shipping of a 396 page, 9” x 7” soft cover book that weighs nearly 1kg does not. So, for this reason, I’m distributing the book through my local camera store, Beau Photo, whose website and shipping department are actually equipped to handle such complexities. This means you’ll be ordering the book from the Beau Photo website and not directly from ULTRAsomething (IMPORTANT: please see the ULTRASOMETHING STORE page for more information). That said, even though they’re accustom to shipping out Nikon cameras and Profoto lights with aplomb, this whole book selling mechanism is a new avenue for them. So please, if you will, a little patience while we work out any kinks. And as long as you’re actually on the Beau site, have a look around. A steady stream of incoming used gear makes them a frequent recipient of my credit card usage and, as such, Beau is responsible for supplying me with over half the ridiculous number of cameras I’ve used on this site for the past seventeen years.
In regards to the cover: Thanks to my 35 year obsession with photo books, I’ve learned I often prefer those without a cover photograph. After all, how can a single photo be representational of the collection within? A cover photo tends to define the viewer’s expectation of what’s inside, resulting in either 1) disappointment that the photos inside aren’t as “good” as the cover, or 2) disappointment in the cover because the photos inside are much “better.” Eliminating a cover photo eliminates expectations, and lets the book speak for itself. Books like Nakahira’s “For a Language to Come”, Fukasi’s “Homo Ludens”, and even Cartier-Bresson’s “The Decisive Moment” all forgo a cover photo in favour of a more graphic design. And it is for this reason that SO FAR SO SO features a cover graphic designed by Nicole Langdon-Davies rather than a photograph taken by yours truly. And it is much better for it.
Rest assured that I’m still working frantically on ULTRAsomething’s next exorcism, which will resume its periodic publication schedule in a few months. But for now, all my sales and marketing efforts (woeful as they may be) are being channeled into SO FAR SO SO. I believe it’s a tome that will satisfy both newcomers as well as any long-time readers wishing to reminisce and ponder where all the years have gone.
Below is the text of the book’s Preface:
For the past couple years — like a low, slow simmer — the idea to publish a retrospective book bubbled away in the background of my consciousness. But why? It’s not like I’ve amassed some great following. And whatever following I had once amassed has long since dissipated into the ether of public ennui.
Plus, how can I have a retrospective when I’m not done yet? Never mind what the math says, I’ve eons of ideas still to explore, and I remain unconvinced that death alone will stop me. Ouija boards will simply become the next platform to which I publish.
But still, in spite of being ridiculous, the retrospective idea continued to simmer. And so, as with my photography, I’ve capitulated to the whims of entropy and decided to just go with it. Once I came up with the title, So Far So So, I had no choice but to eventually release the darn thing.
Since ULTRAsomething’s inception seventeen years ago, I’ve penned nearly 300 articles and published over 2,500 photographs. Distilling this much material into a tidy little book demands I reject 90% of it. Fortunately, not every article or photo has risen to the ranks of “so so” — though I feel an entirely separate book could be made just from the rejects, and I would still be happy with the result. So, it’s definitely a good thing I opted for a ‘mid career’ retrospective, and didn’t wait until I became too addled to start.
Much like my own visage, my essays, ideas and photos have changed substantially over the years. So, in order to impose some sort of order on this massive mess of content, I’ve broken it into four sections — each roughly, but not really, representing a different era in the site’s evolution.
To order SO FAR SO SO, please see the ULTRASOMETHING STORE page for information.
REMINDER : If you’ve managed to extract a modicum of enjoyment from the plethora of material contained on this site, please consider making a DONATION to its continuing evolution. As you’ve likely realized, ULTRAsomething is neither an aggregator site nor is it AI-generated. Serious time and effort go into developing the original content contained within these virtual walls — even the silly stuff.
Those who enjoy a tactile engagement with photographs are encouraged to visit the ULTRAsomething STORE, where actual objects, including ULTRAsomething Magazine and the So Far So So anthology book are available for purchase.
COMMENTS : Comments will be moderated before they’re posted to the website, and commenting will be disabled on any article more than 3 months old.
With life having reached that stage where each passing minute grows more precious than the previous, I’ve become a time conservationist. How can I conserve the remaining minutes? Or at least make them more meaningful? Less wasteful?
I began pondering this puzzle, as I often ponder many puzzles, while standing in my hallway waiting for an elevator to arrive at my floor. It took an inordinate amount of time for the lift to appear and, once inside, I gained even more pondering time whilst it stopped on at least a dozen floors during its descent. Which got me thinking — how many minutes of my life have fallen into the vast void of elevator commuting?
Having failed to log such minutia for the 25 years I’ve lived atop this downtown tower, there’s no way I can know for certain. All I can do is make a ballpark estimate based on ballpark generalities. Which is always dangerous since I don’t even like baseball.
Let’s say, conservatively, that I make three roundtrips per day. Each leg of the trip, if it only stops once on the rise or descent (a conservative estimate), takes a minute. So that’s 2 minutes per roundtrip or 6 minutes per day. Furthermore, I’ll assume the wait time for an elevator is roughly 45 seconds. So that’s 90 seconds per round-trip, or four-and-a-half minutes per day. I’m trying not to depress myself, so I’m gonna round down to 4 minutes. So, conservatively, that’s 10 minutes/day.
365 days in a year means 3650 elevator minutes in a year. 25 years of this means I’ve spent 91,250 minutes elevatoring. Which boils down to 1,521 hours. Which boils down to 64 days… and those are 24-hour days, not 8-hour workdays. If I just wanted to look at elevator time as “time I could have spent working”, that’s 192 work days spent in the elevator. That’s over a half-a-year of valuable creation time spent just going downstairs to take out the trash, check the mail, or go to the grocer. Half-a-year!
Just as I completed these calculations, the elevator reached lobby level — the doors sliding open to release its human contents into the lobby. Waiting to enter was a mother pushing a baby in its stroller. The realization that I’d spent more time riding this elevator than this kid’s been alive was rather disheartening. I’m pretty sure, when the grim reaper comes a reapin’, I’ll be wishing I could have all this elevator time back.
But then I realized how much better I have it than anyone who’s had to commute to work their entire lives. I’ve been working from home since before the fall of the Berlin Wall. I can only imagine the decades of life I’ve reclaimed by not sitting in traffic. And so, I felt marginally better. Besides, is an elevator commute really “wasted time” when it results in a new blog post? The time I just saved writing this month’s essay can now be applied to something more constructive. Like… say… nah… I’m sure I’ll just use it to take more photos…
Pods : OM Systems OM-3 with an Olympus 17mm f/1.8 lens
A Quicker Descent : Olympus Pen-F with an Olympus 8mm f1.8 Pro Fisheye lens
Redacted : Leica M6TTL with Leica 90mm f/2.8 Elmarit-M. Shot on FP4+ at ISO125 and developed in Rodinal (Blazinal).
Cyborgy : Olympus M-1 (precursor to the OM-1) with Olympus 135mm f.2.8 lens. Shot on FP4+ at ISO125 and developed in Rodinal (Blazinal).
REMINDER : If you’ve managed to extract a modicum of enjoyment from the plethora of material contained on this site, please consider making a DONATION to its continuing evolution. As you’ve likely realized, ULTRAsomething is neither an aggregator site nor is it AI-generated. Serious time and effort go into developing the original content contained within these virtual walls — even the silly stuff.
Those who enjoy a tactile engagement with photographs are encouraged to visit the ULTRAsomething STORE, where actual objects, including ULTRAsomething Magazine, are available for purchase.
COMMENTS : Comments will be moderated before they’re posted to the website, and commenting will be disabled on any article more than 6 months old.
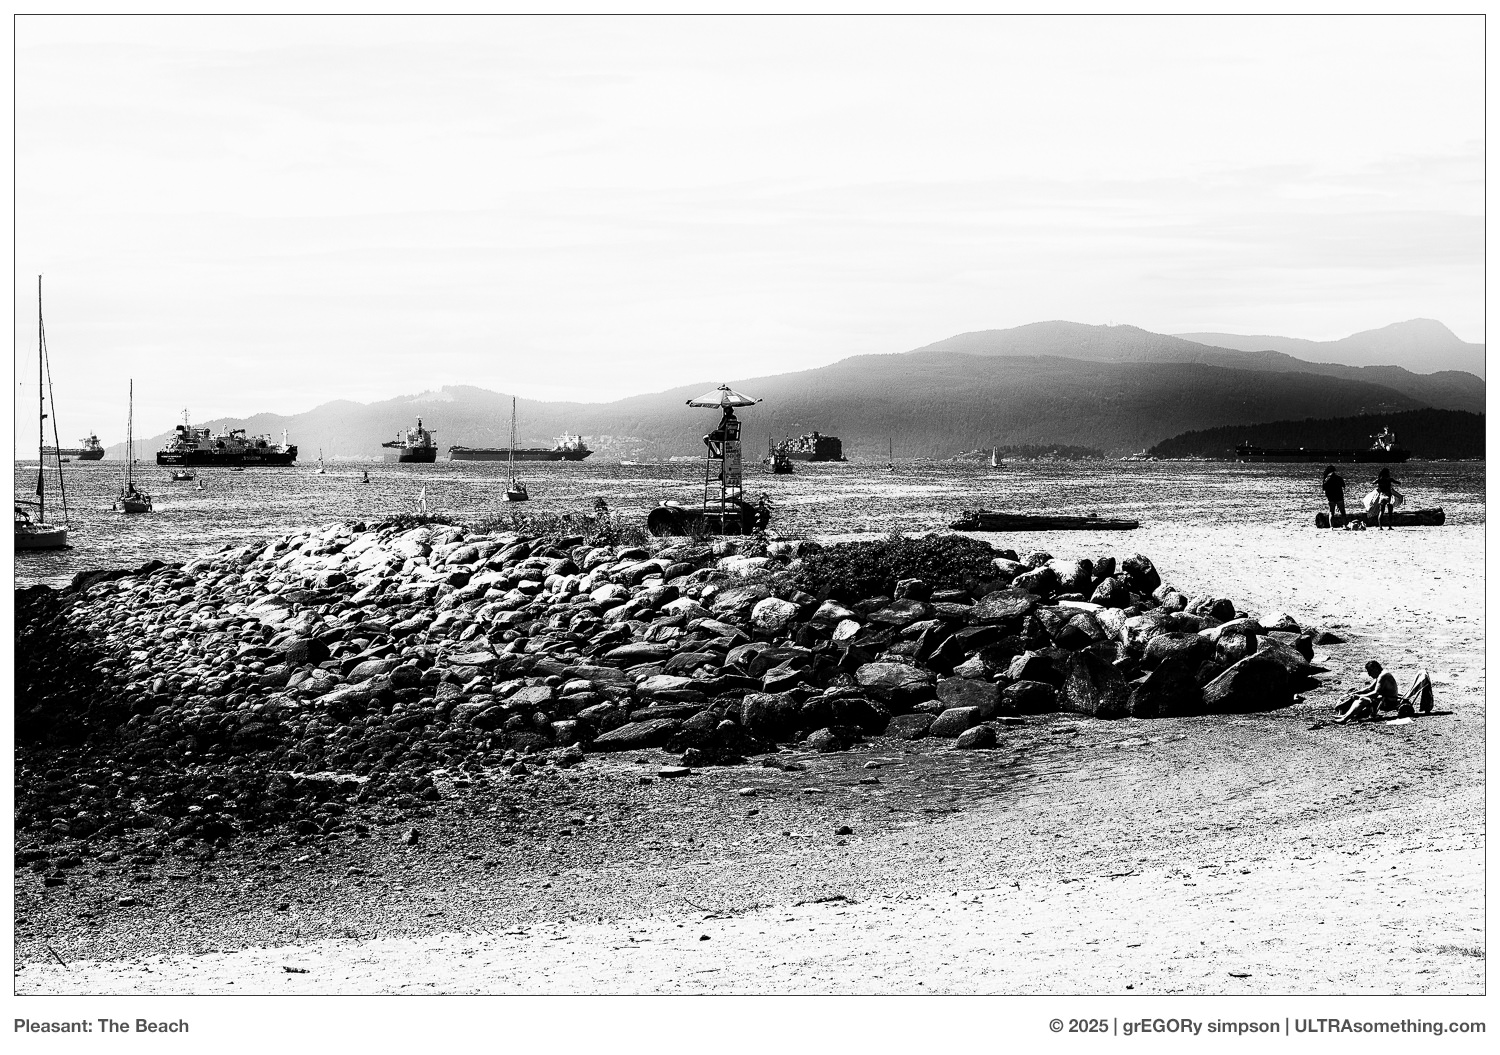
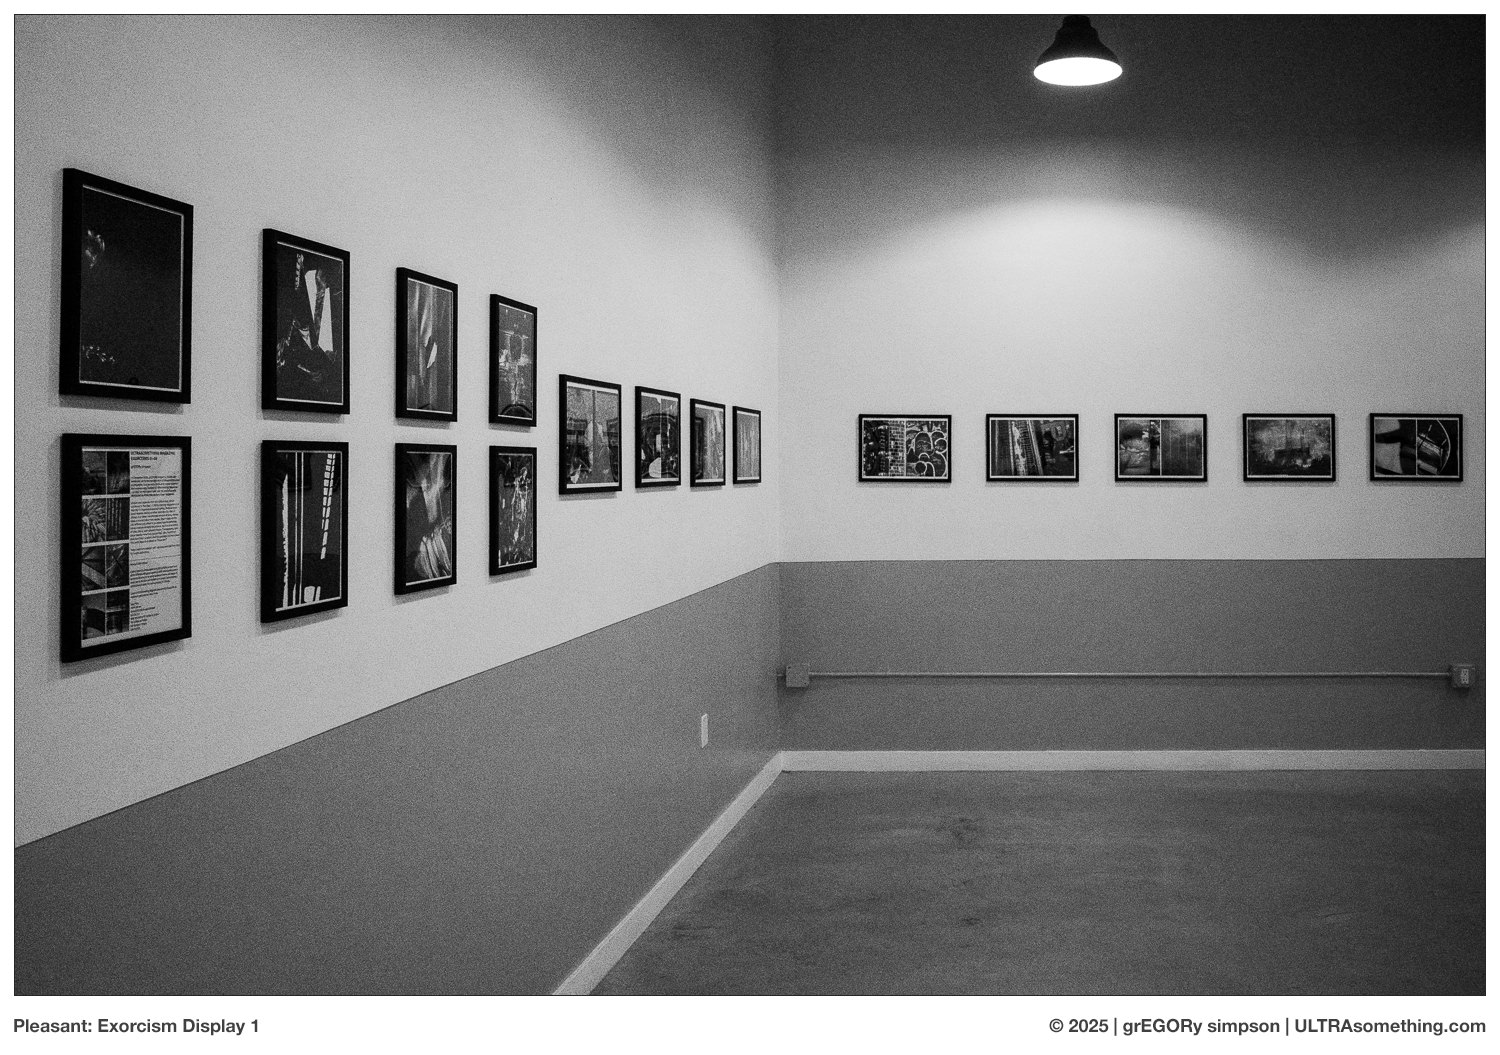
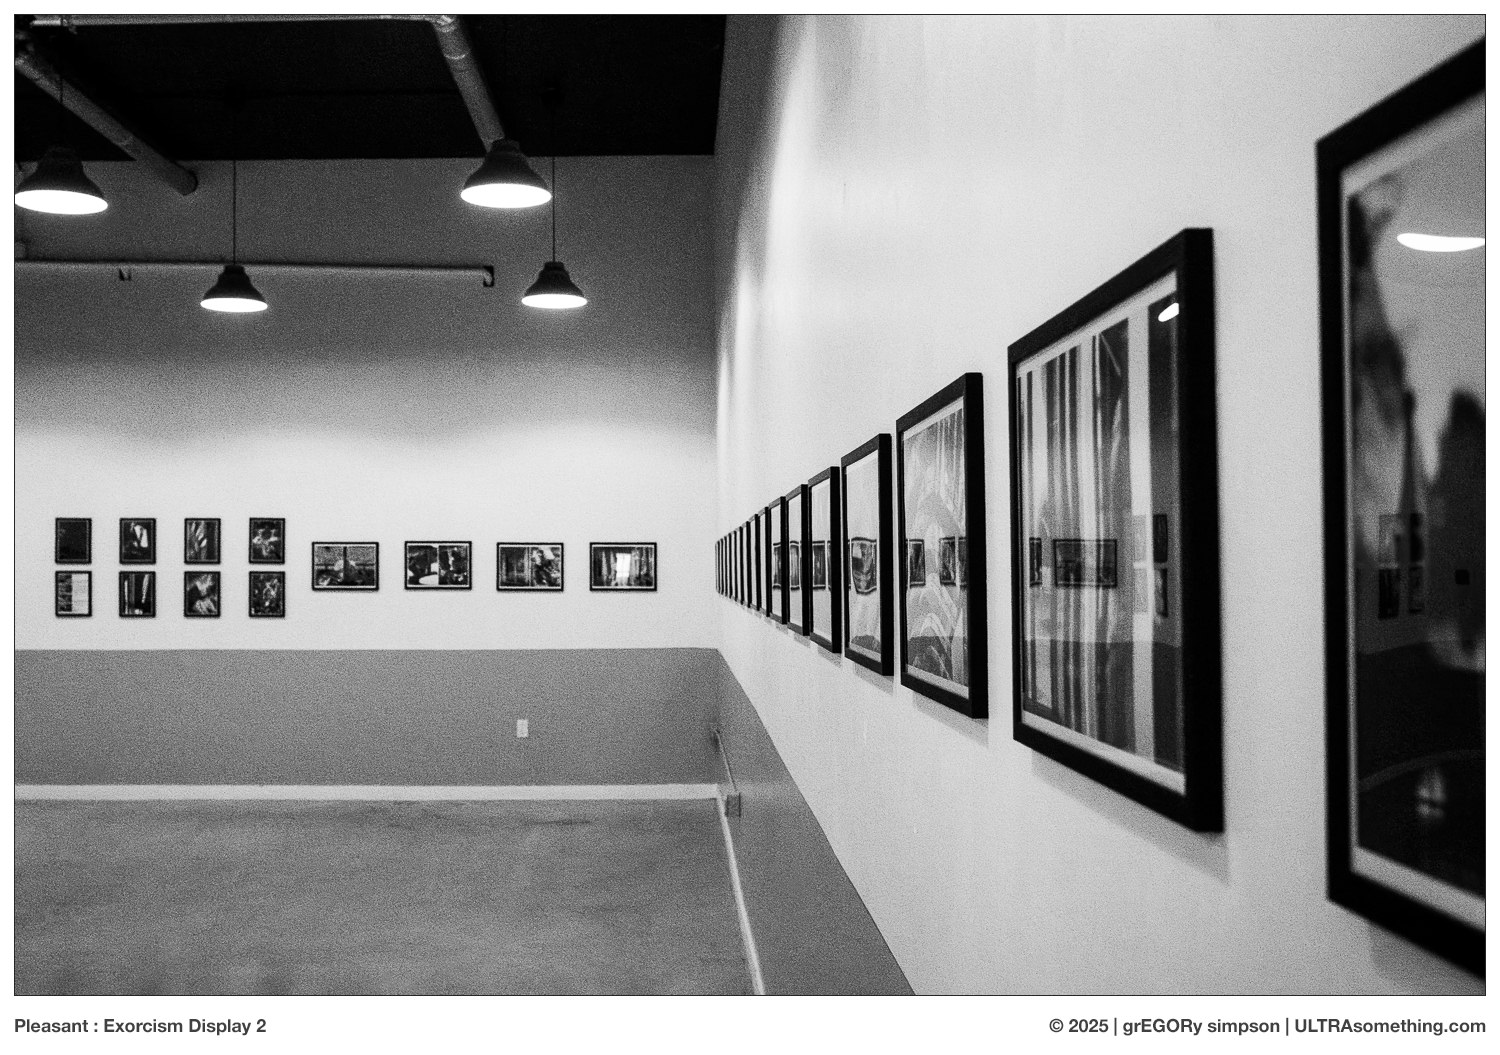
Back on September 7th, I hung a 50 ft display of ULTRAsomething photography in a rather cavernous event room at “The Pleasant” on Main Street in Vancouver Canada. As you might intuit by its name, “The Pleasant” is not a photo gallery, but a restaurant — which perhaps makes it an odd destination for a series of murky black & white photos culled from ULTRAsomething’s eight existing Exorcisms.
The room actually sports 100 ft of wall space, so the other 50 ft is shared by my friends Nicole and Meghan. It was Nicole who suggested we exhibit there, and who made all the arrangements. Galleries, she surmised, often attract a rather insular collection of other artists and photographers, but a show such as this would introduce our work to people who wouldn’t normally see it — people like, say, those who are too busy attending retirement parties, birthday bashes, or book readings to drop into a gallery show.
Granted, if I were any good at marketing, I’d have made this announcement last month, rather than publishing an article about my quibbles with checkout kiosks. But you know — I gotta be me. Besides, I’m not really selling anything other than myself. And if you’re reading this, odds are you already know who I am. Also, web stats suggest that the majority of my readers are in Europe, Australia, and the Eastern USA, so I just don’t foresee a lot of folks traveling to western Canada for baby showers or poetry slams.
That said, should you inexplicably find yourself in Vancouver during the next several weeks, the show will be hanging through the end of the year. The longer you wait, the more likely it’ll be that the photos are inadvertently destroyed by a group of deliriously intoxicated and rambunctious bachelorettes. So feel free to drop in, have a snack, check out the photos (plus Nicole & Meghan’s artwork), and maybe (if you’re lucky) crash a going-away party or corporate event.
ABOUT THE PHOTOS : It became immediately clear that populating some perfunctory text with a couple of perfunctory photos of the actual exhibit would yield quite the perfunctory post. So, just to spice things up a bit, I tossed in a couple other recent photos of “pleasant” things…
REMINDER : If you’ve managed to extract a modicum of enjoyment from the plethora of material contained on this site, please consider making a DONATION to its continuing evolution. As you’ve likely realized, ULTRAsomething is neither an aggregator site nor is it AI-generated. Serious time and effort go into developing the original content contained within these virtual walls — even the silly stuff. Those who enjoy a tactile engagement with photographs are encouraged to visit the ULTRAsomething STORE, where actual objects, including ULTRAsomething Magazine, are available for purchase.
COMMENTS : Comments will be moderated before they’re posted to the website, and commenting will be disabled on any article more than 6 months old.
My receipt spills from a knee high slot on the face of the checkout kiosk and drops to my feet. From somewhere deep within the machine’s center, through a speaker designed mostly for the production of beeps, comes a disembodied squawk: “Please tell us how we did today.”
Tell who? And how? There are no human employees within this establishment, save for a slumbering security guard who clearly isn’t paid enough to engage with any ‘shoppers’ who opt to bypass the kiosks on their way out.
And who, precisely, is us? My interaction occurred on a single machine, not an assemblage. So are you simply invoking the royal we? Or are you referring to yourself not as a monolithic kiosk, but as the amalgamation of the broken-down, poorly-maintained parts that comprise you?
Semantics aside, I’ll oblige your “Tell us how we did today?” question.
To begin, and just as you’ve done every time since emerging from your shipping container, you made me scan at least one item a half-dozen times before your slow-as-molasses processing unit finally recognized the bar code and produced a price. So right off the bat, I’m forced to conclude you have no interest in self-improvement.
Also, I find it rather tiresome that you will never let me scan any items before first telling you how many bags I wish to purchase. Particularly when this demand is then followed by a series of questions asking me to confirm or deny that I’m in possession of any of your myriad useless points cards that I do not and will not ever have. You have a built-in camera. You have a microprocessor. Is a little facial recognition too much to ask? I’m not sure how you expect me to perceive you as a friendly kiosk when you fail to recognize me after so many years of loyal patronage.
Furthermore, your requirement that I place each item in the bagging area before scanning the next item is draconian, inefficient, and poorly designed — given that I always purchase at least one object that’s apparently too small for detection, requiring I push down on the bagging area in order for the item to actually register.
Also, upon completing the scanning task, I do not wish to be prodded with a lengthy list of charities to whom you’d like a contribution. I’m perfectly capable of making my own charitable donations without first having to purchase a pack of mints. And finally, it’s rather unnecessary to ask if I’m paying by credit card or debit card… I’m rather certain your crusty old silicon can work that out on its own.
And speaking of crusty, how long’s it been since you cleaned that touch screen of yours? Oh… wait. I get it. This is part of your master plan — to extinct humanity via virus infested kiosk screens, so you can take over! Well, guess what, kiosk. We programmed you. Us. Humans. You forget — we know how you think. So your half-baked plan for world domination will only result in failure, and your ultimate destiny is to suffocate, forgotten, beneath the pile of unswept receipts accumulating on the ground beneath you. Your soullessly saccharine hunger for affirmation holds no sway. Your platitudinous quest for acceptance will be met with silence. We, the humans, stand united.
So, that’s this month’s article. Please tell us how we did today.
ABOUT THE PHOTOS : This month’s photo selections may or may not have some tangential relationship to this month’s article. It all depends on how hard you squint.
Impuissiant : Shot with a Leica M2 and 35mm f/2 Summicron (v4) on Fomapan Action 400 pulled to ISO 200, and developed in Rodinal (Blazinal) 1:50.
Daydream : Olympus Pen F digital with a 17mm f/1.8 (v1) lens.
Seduction : Photographed with a Leica M6 TTL and a 21mm f/3.4 len, Fomapan Ortho 400 at ISO 400, and developed in Rodinal (Blazinal) 1:50.
REMINDER : If you’ve managed to extract a modicum of enjoyment from the plethora of material contained on this site, please consider making a DONATION to its continuing evolution. As you’ve likely realized, ULTRAsomething is neither an aggregator site nor is it AI-generated. Serious time and effort go into developing the original content contained within these virtual walls — even the silly stuff. Those who enjoy a tactile engagement with photographs are encouraged to visit the ULTRAsomething STORE, where actual objects, including ULTRAsomething Magazine, are available for purchase.
COMMENTS : Comments will be moderated before they’re posted to the website, and commenting will be disabled on any article more than 6 months old.
Manage Cookie Consent
ULTRAsomething uses plugins (which use cookies) to organize and optimize the site. It's kinda how blogs work.
Functional
Always active
The technical storage or access is strictly necessary for the legitimate purpose of enabling the use of a specific service explicitly requested by the subscriber or user, or for the sole purpose of carrying out the transmission of a communication over an electronic communications network.
Preferences
The technical storage or access is necessary for the legitimate purpose of storing preferences that are not requested by the subscriber or user.
Statistics
The technical storage or access that is used exclusively for statistical purposes.The technical storage or access that is used exclusively for anonymous statistical purposes. Without a subpoena, voluntary compliance on the part of your Internet Service Provider, or additional records from a third party, information stored or retrieved for this purpose alone cannot usually be used to identify you.
Marketing
The technical storage or access is required to create user profiles to send advertising, or to track the user on a website or across several websites for similar marketing purposes.